
How Coffee Roasting Works: a Home Brewer's Guide
Coffee roasting is the heat-driven chemical process that transforms raw green beans into the aromatic, flavorful coffee you brew every morning. Understanding how coffee roasting works gives you direct control over what ends up in your cup. A typical home roasting session lasts 8 to 15 minutes and finishes between 196 and 230 °C depending on your target roast level. Every flavor note you taste, from bright citrus acidity to deep chocolate richness, is a direct product of how heat was applied, for how long, and when the roast was stopped.
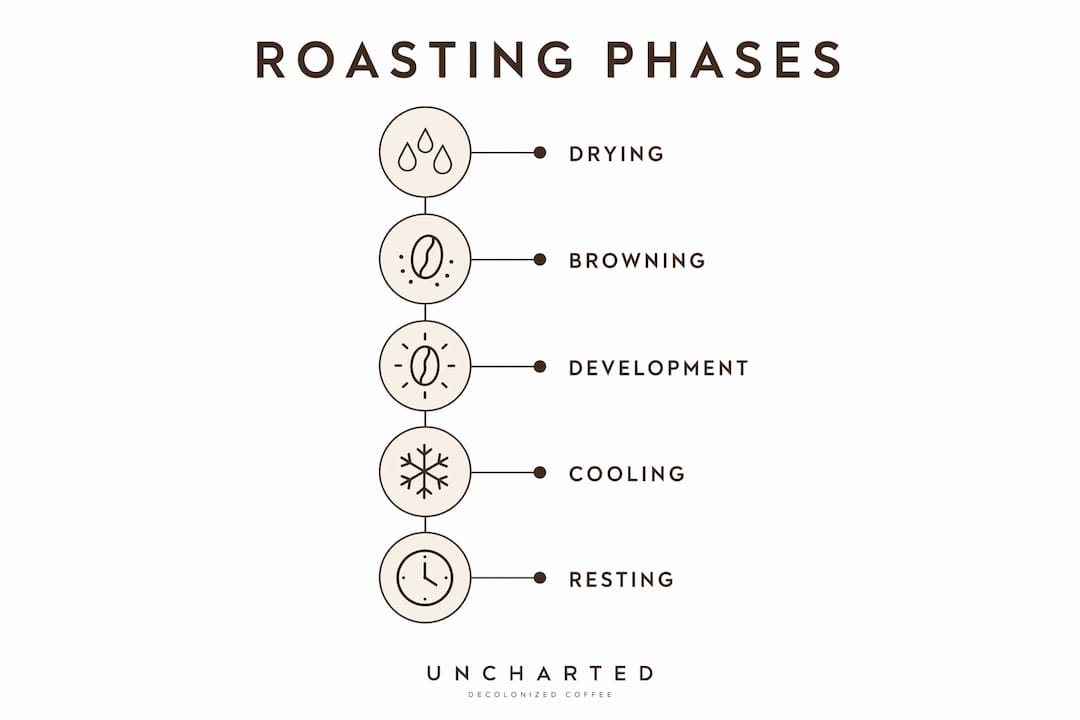
How the coffee roasting process works, phase by phase
The coffee roasting process moves through three distinct phases: drying, browning, and development. Each phase triggers specific chemical reactions that build or destroy flavor. Miss the window on any one of them and the cup suffers. Here is what actually happens inside the bean at each stage.
Phase 1: drying (160 to 190 °C)
Green coffee beans contain roughly 10 to 12 percent moisture. The drying phase drives that moisture out as steam, which is why beans turn from green to yellow before any browning occurs. This phase is largely endothermic, meaning the bean absorbs heat without releasing it. The roasting heat behavior shifts from endothermic to exothermic near 175 °C, a transition that signals the bean is ready to begin browning. Rushing through the drying phase by applying too much heat too fast produces grassy, underdeveloped flavors that no amount of brewing skill can fix.
Phase 2: browning (190 to 220 °C)
This is where the magic begins. Two major reactions drive the browning phase: the Maillard reaction and caramelization. The Maillard reaction is a chemical interaction between amino acids and reducing sugars that creates hundreds of new flavor and aroma compounds. Caramelization breaks down sucrose and produces the sweet, nutty, and toasty notes you associate with medium roasts. Bean color deepens from yellow to tan to light brown, and the roasting room fills with a rich, bready aroma. Roasting progresses through browning with Maillard and caramelization reactions peaking around 190 to 220 °C, building the flavor foundation for every roast level above light.

Phase 3: development (220 to 240 °C)
The development phase begins at first crack and is where roast level is decided. First crack occurs around 196 °C as internal steam pressure builds until the bean’s cell walls rupture audibly. After first crack, sugars caramelize further, acids break down, and CO2 production increases sharply. Stopping roasting shortly after first crack yields bright, acidic flavors with strong origin character. Second crack occurs around 224 °C as the bean’s physical structure breaks down further and oils begin migrating to the surface, signaling dark roast territory. The interval between first and second crack is the primary development window where small timing differences produce dramatically different cups.
Pro Tip: Record the exact time between first crack and the end of your roast on every batch. Even a 15-second difference in development time can shift a coffee from floral and tea-like to rich and chocolatey.
How roasting temperature and time shape flavor
Roast level is not a single temperature. It is the combined result of how fast you reach a temperature, how long you hold there, and when you pull the beans. This is why two roasters using the same green coffee can produce completely different cups.
| Roast level | Temperature range | Flavor profile | Brewing notes |
|---|---|---|---|
| Light | 196 to 205 °C | Bright acidity, floral, fruit-forward, strong origin character | Best for pour-over, Chemex, AeroPress |
| Medium | 205 to 215 °C | Balanced acidity and body, caramel sweetness, reduced origin notes | Versatile: drip, pour-over, flat white |
| Medium-dark | 215 to 225 °C | Low acidity, fuller body, roast-driven chocolate and nut notes | Espresso, French press, moka pot |
| Dark | 225 to 240 °C | Minimal acidity, heavy body, bitter and smoky, origin largely lost | Espresso blends, cold brew |
Lighter roasts preserve the origin character of the bean, which is why a single-origin Ethiopian light roast tastes nothing like a Colombian dark roast even if both started as high-quality green coffee. Bean origin plays a defining role in what flavors survive or get amplified through roasting. The risk with dark roasting is that pyrolysis, the breakdown of organic compounds at very high heat, overwhelms every nuance the farmer and processor worked to develop. Roasting is about developing flavor enough to unlock complexity but stopping before pyrolysis causes a generic, overpowering roast taste.
Pro Tip: If you are brewing with a pour-over method like a Hario V60 or Chemex, pull your roast within 60 seconds of first crack. The clarity of those brewing methods will expose every flaw in an overroasted bean.
What roasting methods and equipment do home brewers use?
The equipment you roast in determines how heat reaches the bean, which shapes flavor as much as temperature does. There are two primary heat transfer mechanisms in coffee roasting, and each produces a noticeably different result.
Drum roasting uses conductive heat by tumbling beans inside a rotating drum over a heat source. This slower, contact-based heat transfer creates complex, layered flavor profiles because the bean surface and interior heat at slightly different rates. Commercial drum roasters from brands like Probat and Giesen are the industry standard. Hot-air roasting, also called fluid bed roasting, uses convective heat to suspend and agitate beans in a stream of hot air. The result is a cleaner, brighter cup with more consistency batch to batch, since every bean receives uniform heat exposure.
For home roasters, the options break down into four practical approaches:
- Oven roasting: Accessible but inconsistent. Spread green beans on a baking sheet at 230 to 260 °C and stir frequently. You lose the ability to hear first crack clearly, and heat distribution is uneven. Acceptable for experimentation, not for repeatable results.
- Popcorn popper: The classic entry point for home roasting. Hot-air poppers like the West Bend Poppery II move beans constantly and roast a small batch in 8 to 10 minutes. Cheap, audible, and surprisingly effective for learning the basics.
- Dedicated home roaster: Machines like the Behmor 1600 Plus or the Hottop KN-8828B offer drum-style roasting with programmable profiles, smoke suppression, and built-in cooling. These give you the most control short of a commercial machine.
- Cast iron pan or wok: Stovetop roasting requires constant stirring and good ventilation. It produces inconsistent results but teaches you to read color and aroma quickly, which is genuinely useful sensory training.
Cooling method matters as much as the roast itself. Rapid cooling after roasting is necessary to stop chemical reactions and lock in the desired roast level. Improper cooling allows the roast to continue developing from residual heat, which can push a medium roast into medium-dark territory without you realizing it. Transfer beans immediately to a colander or mesh tray and use a fan or the roaster’s built-in cooling cycle to drop the temperature within 3 to 5 minutes.
Key techniques for controlling roast quality at home
Knowing the phases is theory. Controlling them is practice. These are the specific indicators and techniques that separate a consistent home roaster from someone who just gets lucky occasionally.
- Listen for first crack. The sound is unmistakable: a series of sharp pops similar to popcorn. First crack signals the transition from drying to development and is your primary timing cue. Start your development timer the moment you hear the first pop.
- Watch bean color continuously. Color shifts from yellow to tan to cinnamon to brown to dark brown. Use a color reference card or the Agtron scale if you want precision. Your eyes are your most reliable real-time instrument.
- Track aroma as a secondary signal. Grassy and hay-like aromas indicate the drying phase. Bread and toast signal browning. Sweet caramel and fruit notes mean you are in development. Acrid or smoky aromas mean you are approaching or past second crack.
- Use Rate of Rise as your heat management tool. Rate of Rise, or RoR, measures how fast bean temperature increases during roasting. A smooth, gently declining RoR curve indicates even heat application. Sudden spikes, called flicks, or sharp drops, called crashes, create uneven development and off-flavors. Apps like Artisan or Cropster log RoR in real time if your roaster has a temperature probe output.
- Keep batch sizes consistent. Changing batch size changes how heat moves through the beans. Stick to the same weight until you have a roast profile you can repeat reliably.
Pro Tip: After roasting, rest your beans for 24 to 48 hours before brewing. CO2 off-gassing from the development phase is still active immediately after roasting and will interfere with extraction, especially in espresso.
Key takeaways
Coffee roasting is a precise, phase-driven process where temperature, time, and cooling decisions determine every flavor note in your final cup.
| Point | Details |
|---|---|
| Three phases define every roast | Drying, browning, and development each require specific heat management to build flavor correctly. |
| First crack is your primary marker | First crack at around 196 °C signals the start of development; your timing from this point sets roast level. |
| RoR guides heat consistency | A smooth, declining Rate of Rise curve prevents flavor defects caused by heat spikes or crashes. |
| Cooling stops the roast | Rapid cooling within 3 to 5 minutes locks in your target roast level and prevents over-development. |
| Method shapes flavor | Drum roasting adds complexity; hot-air roasting adds clarity. Choose equipment based on the flavor profile you want. |
What roasting has taught me about paying attention
I spent years drinking coffee before I understood what I was actually tasting. The first time I pulled a light roast 45 seconds after first crack instead of my usual 90 seconds, the cup tasted like a completely different coffee. Same beans, same grinder, same water temperature. That single change revealed a layer of stone fruit and bergamot I had never noticed before. It was one of the clearest lessons I have had in how small decisions compound into meaningful outcomes.
What roasting teaches you, more than any brewing technique, is how to pay attention. You learn to hear the difference between early first crack and rolling first crack. You learn what “just right” smells like versus “30 seconds too long.” That sensory vocabulary transfers directly to grinding coffee at home and to every brewing decision you make afterward. The journey from cherry to bean involves dozens of human decisions before the green coffee even reaches you. Roasting is your chance to honor or undermine all of them.
The uncomfortable truth about home roasting is that most people plateau quickly because they stop experimenting. They find a profile that works and repeat it without curiosity. The roasters who keep improving are the ones who change one variable at a time, take notes, and taste with genuine attention. That practice, not the equipment, is what produces exceptional coffee.
— Jasmine
Start your home roasting practice with Uncharted Coffee
Uncharted Coffee sources green beans grown with regenerative practices, which means the flavor you develop through roasting starts from a foundation of genuine quality. The Revive Cold Brew from Costa Rica’s highlands is a strong starting point for home roasters who want a forgiving, expressive bean with clear flavor markers at every roast level. Uncharted Coffee exists to turn your daily cup into something intentional, and understanding how your beans were roasted is a direct part of that. Explore the full range at drinkuncharted.com and find the beans that match where you are in your roasting practice.
FAQ
What is coffee roasting?
Coffee roasting is the heat-driven process that transforms raw green coffee beans into the aromatic, flavorful beans used for brewing. It develops sugars, acids, and aromatic compounds through chemical reactions including the Maillard reaction and caramelization.
What temperature does first crack occur at?
First crack occurs at approximately 196 °C as internal steam pressure causes the bean’s cell walls to rupture audibly. This moment marks the beginning of the development phase and is the primary timing cue for roast level decisions.
How long does home coffee roasting take?
A typical home roasting session takes 8 to 15 minutes depending on batch size, equipment, and target roast level. Popcorn poppers and dedicated home roasters like the Behmor 1600 Plus complete small batches in roughly 10 minutes.
What is Rate of Rise in coffee roasting?
Rate of Rise, or RoR, measures how quickly bean temperature increases per minute during roasting. A smooth, gently declining RoR curve indicates even heat application, while sudden spikes or drops signal heat management problems that create flavor defects.
How does roast level affect brewing?
Light roasts retain more acidity and origin character, making them ideal for pour-over methods like the Hario V60 or Chemex. Dark roasts develop heavier body and roast-driven flavors that hold up well in espresso and French press brewing.
Recommended
- How a Coffee Cherry Becomes a Bean: Full Guide – Uncharted Coffee Supply
- How to Grind Coffee Beans at Home for Better Flavor – Uncharted Coffee Supply
- Espresso Extraction Explained for Serious Coffee Lovers – Uncharted Coffee Supply
- What Is Specialty Coffee Explained for True Enthusiasts – Uncharted Coffee Supply